esxi
跳过 12 13代 大小核 CPU 检查: https://www.virten.net/2022/11/esxi-7-and-8-installation-fails-with-fatal-cpu-mismatch-on-feature/
shift + O,添加空格输入(不要删除) cpuUniformityHardCheckPanic=FALSE autoPartitionOSDataSize=8192
When ESXi installation starts, press SHIFT+O to edit boot options. Append
cpuUniformityHardCheckPanic=FALSEPress ENTER Install ESXi When the installation is finished, reboot the system and press SHIFT+O to edit the boot options again.
Append
cpuUniformityHardCheckPanic=FALSEand press ENTER To make the kernel option permanent, run the following command on your ESXi host:esxcli system settings kernel set -s cpuUniformityHardCheckPanic -v FALSEFor 13th Gen Intel CPUs (Raptor Lake), you also have to enable kernel option ignoreMsrFaults to prevent PSOD during VM startups. (Credit to William Lam for providing a solution for the PSOD Issue)
esxcli system settings kernel set -s ignoreMsrFaults -v TRUEThis setting allows ESXi to work with different P-Cores and E-Cores, present in 12th Gen Intel CPUs.
查看修改结果:
esxcli system settings kernel list | grep -E 'cpuUniformityHardCheckPanic|Configured|ignoreMsrFaults'
# [root@localhost:~] esxcli system settings kernel list | grep -E 'cpuUniformityHardCheckPanic|Configured|ignoreMsrFaults'
# Name                                     Type    Configured          Runtime                           Default             Description
# cpuUniformityHardCheckPanic              Bool    FALSE               FALSE                             TRUE                Panic if CPU uniformity hard check fails
# ignoreMsrFaults                          Bool    TRUE                FALSE                             FALSE               Ignore general protection faults as a result of rdmsr and wrmsr instructions
不能直通pci网卡
设置并重启:
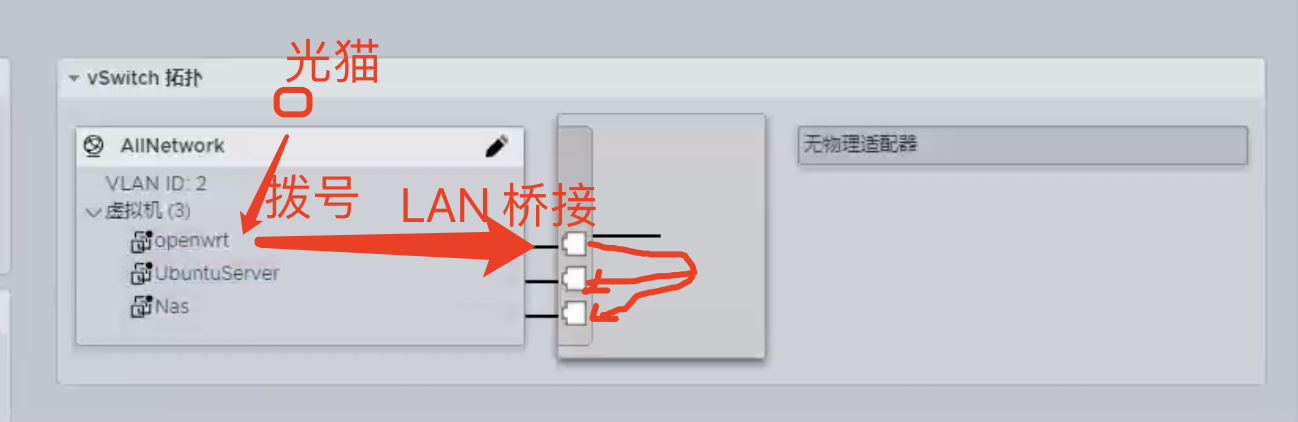
如何在断网的时候,连接管理 esxi
- 断开路由器,设置两个静态 ip 同一网段,不要设置网关。笔记本可以关闭WiFi,通过有线连接并设置
虚拟机 openWRT 拨号,虚拟网卡共享网络给虚拟机
设置
- WAN
- LAN_Bridge
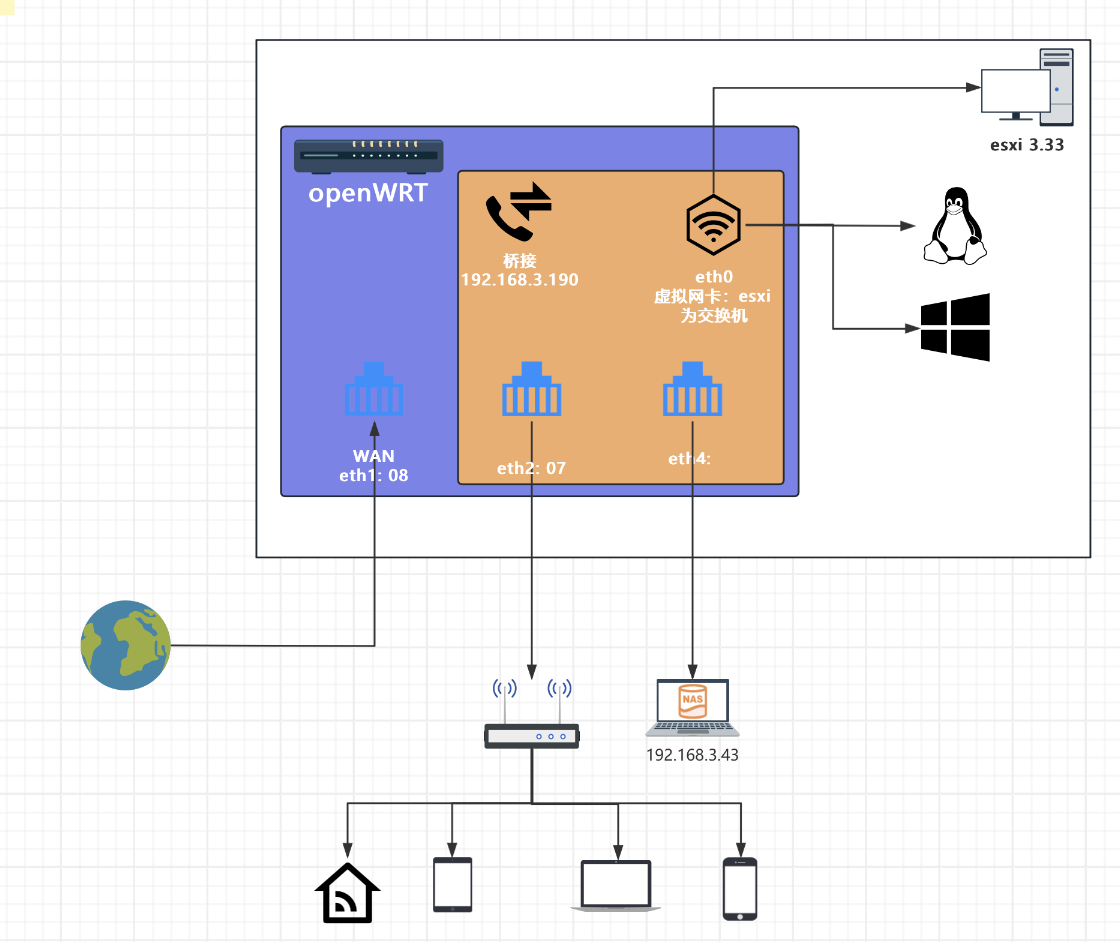
OpenWRT network 配置
# /etc/config/network
config interface 'wan'
        option ifname 'eth0'
        option proto 'dhcp'

config interface 'lan'
        option ifname 'eth1'
        option proto 'static'
        option ipaddr '192.168.6.2'
        option netmask '255.255.255.0'
# 查看网络
ifconfig

ip link
esxi 虚拟网桥原理
参考
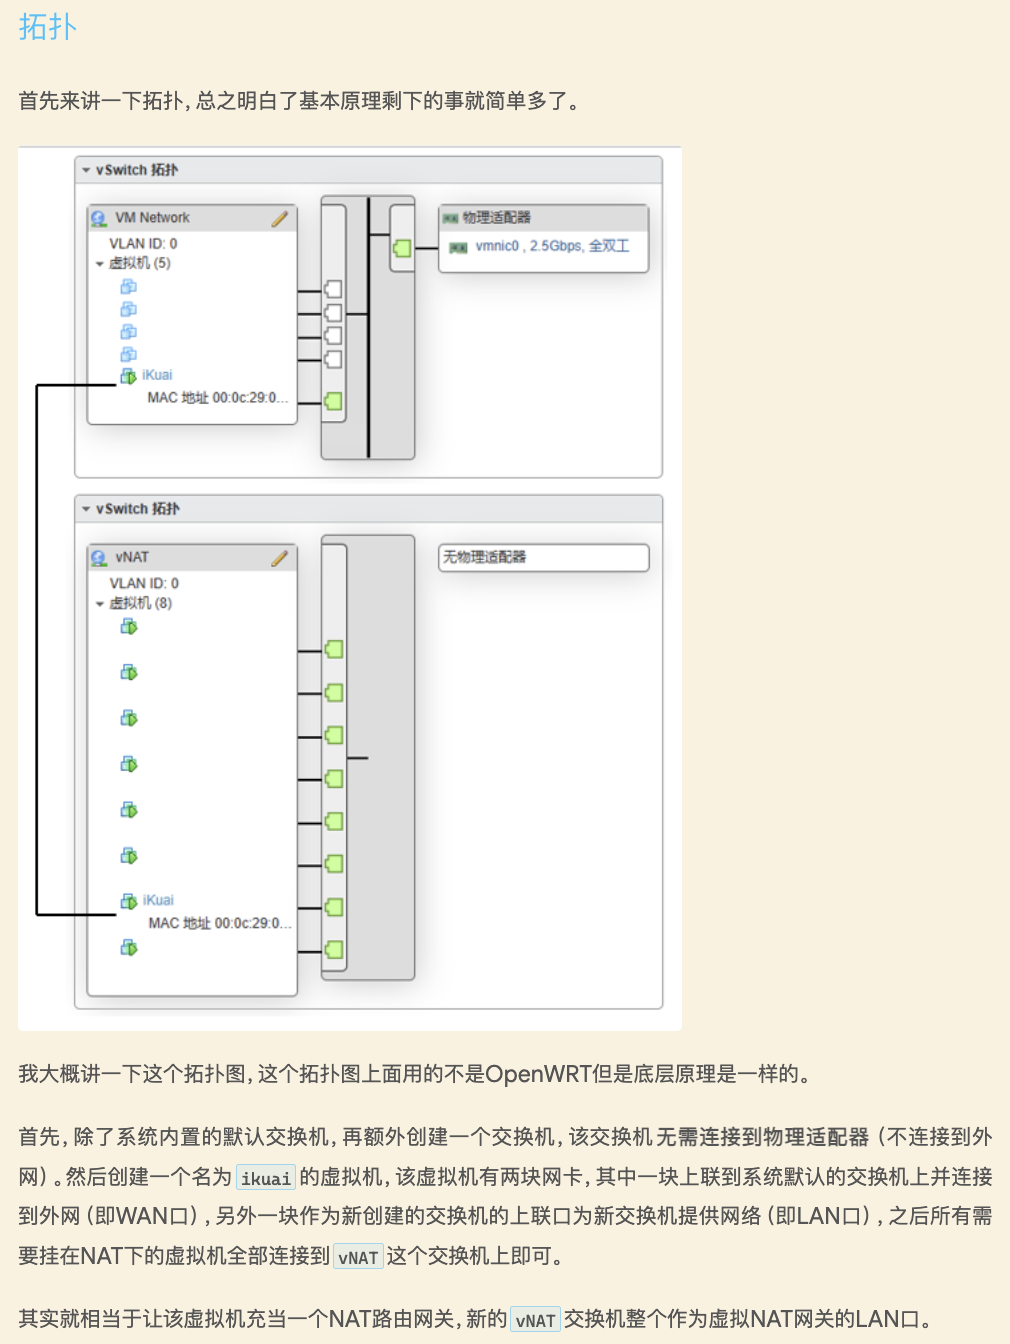
- 虚拟机添加网络适配器:选择端口组
- 在 openWRT 中,看到的端口组是
虚拟网卡ethX。可以作为网络的出口 - 在 windows 其他系统中,作为网络的入口
- 在 openWRT 中,看到的端口组是
- 端口组:绑定
虚拟交换机 - 虚拟交换机:可以添加物理上行链路,如果 openWRT 拨号,不需要上行链路
问题:路由器与主机网络无法协商 1Gbps
方案:
- 光猫直通网口给 openWRT,openWRT WAN 拨号
- esxi 建立虚拟交换机和端口组,其他虚拟机添加端口组为网络适配器
- openWRT 桥接虚拟网卡和物理网卡(其他直通网口)给 esxi 的 ethX
- esxi 虚拟机共享网络
esxi 的管理网口不可以公用?设置VLAN 无效。
当直通GPU后,无法修改 esxi 网络,还是留着一个网口来设置网络比较安全。
注意:当GPU直通后,不小心设置 esxi 管理网络会导致 esxi 失联的话,很可能通过网口来固定 ip 也连接不了。所以操作管理网口要谨慎
思考:是否可以通过 U 盘引导修复系统网络设置?
直通 GPU 和 USB
修改两个配置文件:
[root@localhost:~] [root@localhost:/var/log] lspci -v | grep NVIDIA -A1
0000:01:00.0 Display controller VGA compatible controller: NVIDIA Corporation GA106 [GeForce RTX 3060 Lite Hash Rate]
         Class 0300: 10de:2504
--
0000:01:00.1 Multimedia controller Audio device: NVIDIA Corporation GA106 High Definition Audio Controller
         Class 0403: 10de:228e
[root@localhost:/var/log]

# 配置 PCI 设备为直通
[root@localhost:~] vi /etc/vmware/esx.conf
# 添加
/device/0000:01:00.0/owner = "passthru"

# 配置 ESXi 在处理该设备时不会自动处理桥接、链接状态和电源管理功能
[root@localhost:~] vi /etc/vmware/passthru.map
# NVIDIA
10de  2504  bridge   false
10de  2504  link     false
10de  2504  d3d0   false
在虚拟机设置参数
hypervisor.cpuid.v0:FALSE
pciPassthru.use64bitMMIO=”TRUE”
pciPassthru.64bitMMIOSizeGB=24
遇到开机几分钟后关机问题:
ha-datacenter 中 localhost.localdomain 上有关 win10 的错误消息: PCIPassthru 1:0.0: 客户机已尝试将 4096 设备页 (基本地址为 0x524288) 映射到主内存所占用的范围。这超出了 PCI Hole 的范围。请将 pciHole.start = "2048" 添加到配置文件中,然后打开虚拟机电源。
添加参数解决:
pciHole.start = "2048"
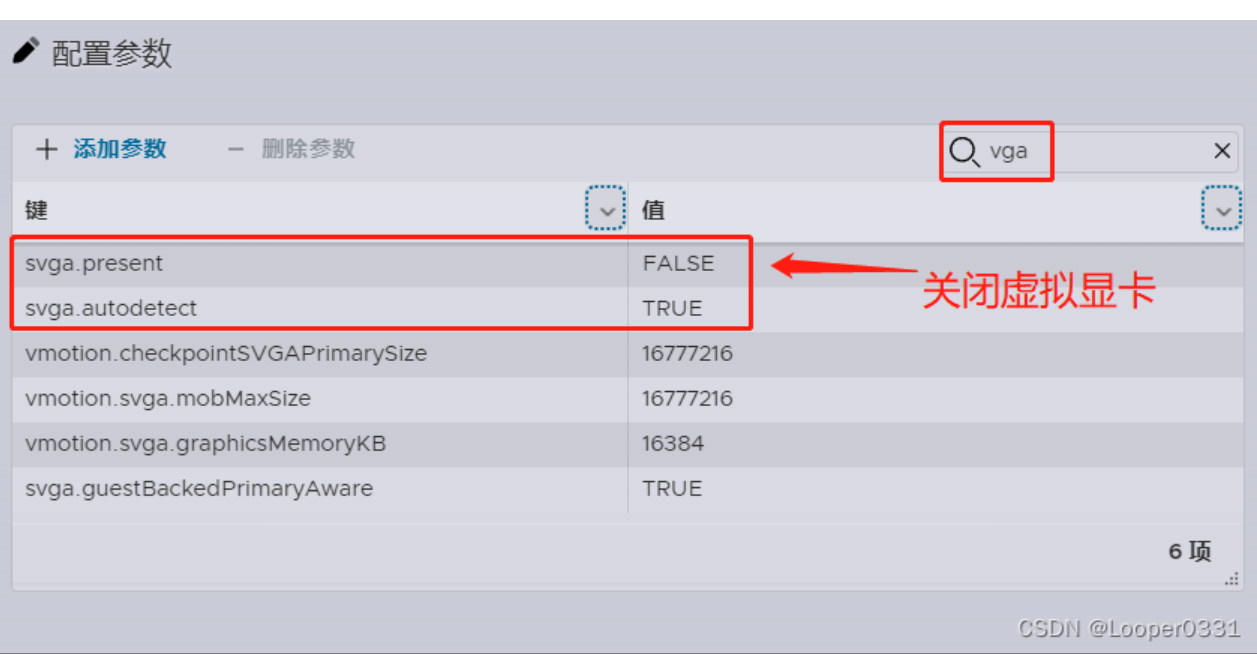
问题:window 虚拟机会有两个显卡,要禁用虚拟显卡,播放视频和显示才会用到直通显卡
应该可以通过配置参数,关闭虚拟显卡
问题:注意 CPU 插槽和内核数,将插槽改为一个,重启
问题:esxi直通显卡之后 游戏无法打开
腾讯游戏会检测虚拟机不允许打开
问题:esxi 直通显卡后,关闭显示器后重启无法正常开机 esxi
建议可以直接直通一个USB的蓝牙适配器,这样就可以直接通过蓝牙连接多种外设了。
查询 sata
[root@localhost:~] lspci -v | grep "SATA" -A1
0000:00:17.0 Mass storage controller SATA controller: Intel Corporation Raptor Lake SATA AHCI Controller
         Class 0106: 8086:7a62
[root@localhost:~] vi /etc/vmware/passthru.map

8086  7a62  d3d0     false # sata WD3200 300G
Ubuntu 安装 NVIDIA 驱动
1、创建文件,如果没有下载vim编辑器,将vim换成gedit即可
$ sudo vim /etc/modprobe.d/blacklist-nouveau.conf 2、在文件中插入以下内容,将nouveau加入黑名单,默认不开启
blacklist nouveau
options nouveau modeset=0
3、输入以下命令使禁用生效然后重启
sudo update-initramfs -u   #更新系统
sudo reboot
4、重启后验证
lsmod | grep nouveau
5、 下载驱动 run 文件
6、安装驱动
# 列出驱动
dpkg -l | grep nvidia

# 卸载
sudo apt-get remove --purge '^nvidia-.*'
sudo apt-get remove --purge '^libnvidia-.*'
apt update

# 安装编译环境
apt install gcc make build-essential libglvnd-dev pkg-config

wget 下载链接
sudo chmod +x NVIDIA-Linux-xxx.run
sudo ./NVIDIA-Linux-xxx.run # 出现 no device found,类似问题:https://forums.developer.nvidia.com/t/nvidia-smi-shows-no-devices-were-found-and-dmesg-shows-rm-init-adapter-failed-device-minor-number-0/203986

 # 只有安装 open 版本才可以
 # opengl
 sudo ./NVIDIA-Linux-xxx.run
7、重启
sudo reboot
8、验证
nvidia-smi
如果回车后无反应,则禁用成功
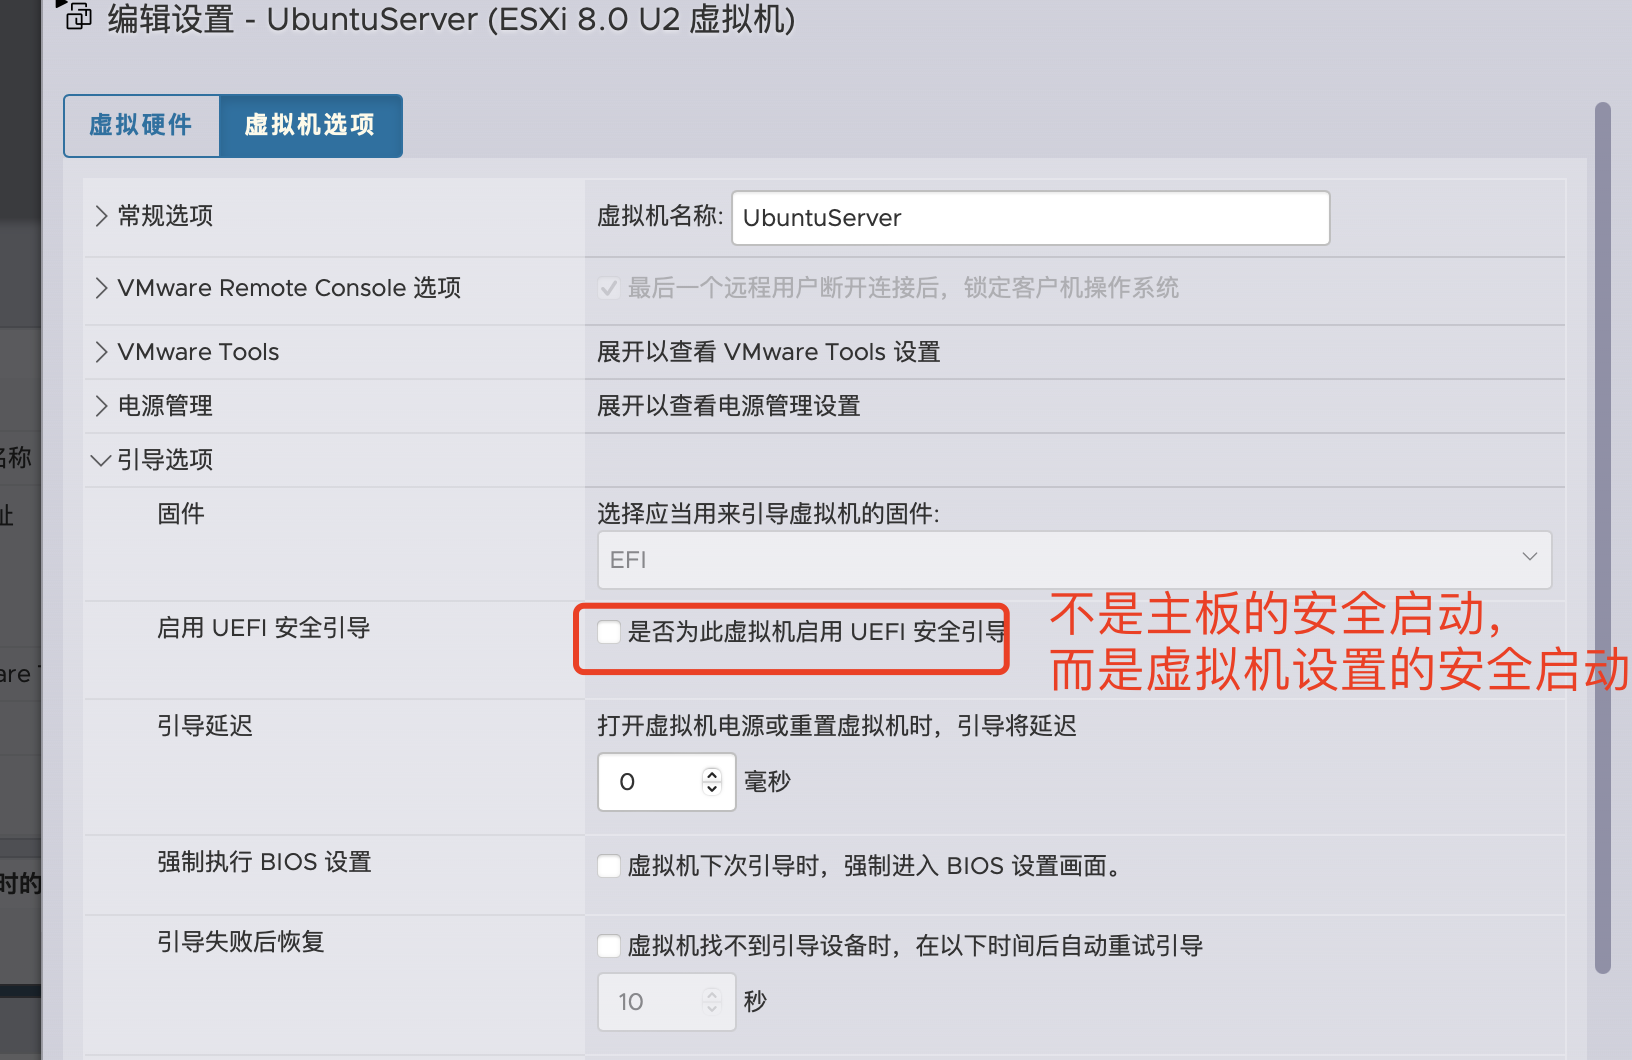
打开安全启动的话,需要对驱动签名,否则内核不会授信

测试过,就算签名,内核也不会授信,只能关闭安全启动
The private signing key will be installed to /usr/share/nvidia/nvidia-modsign-key-0433DF7E.key. After the public key is added to a key database which is trusted by your kernel, you may reuse the saved public/private key pair to sign additional kernel modules, without needing to re-enroll the public key. Please take some reasonable precautions to secure
the private key: see the README for suggestions.
WARNING: Unable to find a suitable destination to install 32-bit compatibility libraries. Your system may not be set up for 32-bit compatibility. 32-bit compatibility files will not be installed; if you wish to install them, re-run the installation and set a valid directory with the --compat32-libdir option.
WARNING: nvidia-installer was forced to guess the X library path '/usr/lib' and X module path '/usr/lib/xorg/modules'; these paths were not queryable from the system. If X fails to find the NVIDIA X driver module, please install the
pkg-configutility and the X.Org SDK/development package for your distribution and reinstall the driver.
参考:
TODO:
直通 USB
[root@localhost:~] lsusb
Bus 001 Device 001: ID 0e0f:8003 VMware, Inc. Root Hub
Bus 001 Device 002: ID 1462:7e06 Micro Star International
Bus 001 Device 003: ID 05e3:0608 Genesys Logic, Inc. Hub
Bus 001 Device 004: ID 258a:013b
Bus 001 Device 005: ID 046d:c084 Logitech, Inc. G203 Gaming Mouse
Bus 001 Device 006: ID 05e3:0608 Genesys Logic, Inc. Hub


[root@localhost:~] vi /etc/vmware/config

usb.quirks.device0 = "0x046d:0xc084 allow"
usb.quirks.device1 = "0x258a:0x013b allow"

# 修改启动项:启动引导中禁用掉VMkernel对 usb 设备获取控制权。
CONFIG./USB/quirks=0x046d:0xc084::0xffff:UQ_KBD_IGNORE:0x258a:0x013b::0xffff:UQ_KBD_IGNORE
问题:
- 配置直通后,开启window10,自动关机
- 重启后,CPU 大小核导致无法引导
- 重启,自动启动 openWRT 失败,电源..
- 网卡变为不可直通状态